
The Gate construction tutorial
The method I used to build the gate can be divide into 4 phases: making the wood & planks, making the rock jambs, making the hardware, and writing the link text. Besides Photoshop, I used two additional resources: Extensis PhotoBevel Solo, a commercially available plug-in filter, and one of a collection of brushes made by Laurie McCanna, available for free on the Internet from here.
Wood Would be Good
First I made wood to "saw" planks from.
I made it using the Craquelure texture filter with Crack Spacing set at 13, Crack Depth set to 10, and Crack Brightness set to 4
Next I attacked the wood with Image-Adjust-Hue/Saturation. I checked the Colorize box and set the sliders H=14, S=99, L=-19. This is what I got;

Now I blurred the wood with the Motion Blur filter with the Angle set to -90 degrees, at a distance of 16 pixels.

Now, with a little color sampling and darkening, and some smudging, you can make some really good-looking wood! Use small points on the pencil as well as with the smudge tool to get a good simulation of grain.

Walkin' the Plank(s)
Make a new image around the size you want the total image to be. Remember that you may want some kind of frame/jamb work around the door, so a black background is what you want to use here.
Then get the rectangular selection marquee and in the Options palette, choose the Fixed Size for the style, and then enter a Height equal to the height of your wood board, and a width you think would work for planks. Think about your width, for you'll want uniform planks to your door and would consider a narrow board on one side as unacceptable. Then simply select and copy segments from the board and then paste them into the new image (HINT: Get a more random effect to your grain by changing which area of the board you copy from. Don't just move over to the adjacent area to copy! Imagine a cookie cutter on flat dough. Move over some!). Paste the planks flush with the bottom, but not tight on the sides. That black around the edges is your friend! Augment the edges of the boards with the smudge tool. Smudge Towards the inside of the board! Don't have a little blip sticking over the edge (Unless you're putting a knot on an edge!)! Here's what you should have!

And to keep your image at a reasonable level of manageability, merge the layers of the planks together, and save your image.
Now for the Stone
What I did to make the stone was similar to what I did for the wood. I made a patch from which to copy stone by going Filter-Texturizer and picking the brick texture. I set the scaling here to 140% and Relief to 25. To help make a random pattern more possible, choose the Top for the light direction. This way you will only have horizontal straight lines (had you gone with a Top Left or Top Right direction, the vertical edges of the bricks would have came in).

Again you will select and copy for your stone, but now you'll use your lasso tool with no fixed dimensions. Simply paste the stone selections around your wood planks. Use your smudge tool to break up any strong straight lines from the brick texture. It should look like so…

You'll obviously want to do some merging of layers of your stone pieces, so go ahead and do that. It would be best NOT to merge all the stonework together, but merge the stones into sides (in other words, merge the stones along the top together, but don't merge the top stones layer with any stones on the sides! Understand?). Here's my logic: since there is going to no wall to put the door on, then the only shadow work needed will be on the inside edges of the stone work. Had there been a wall to put the door on, you would need a shadow on the outer edge of the door opposite to the light source. With no wall, you'll only need to shadow on two inside edges of stones. This is a simple matter of Ctrl-Clicking a stone layer, and then filling the selection (on a new layer, of course!!) with black. Hit this fill with a very mild Gaussian Blur (2 Pixels at most should do you right!), and then Ctrl-Arrow Keys nudge the shadow until it's oriented just right. Again you shouldn't have to move it too much. Save!
Mortar mortar!
Oh yeah! You've gotta hold them stones in somehow! I just chose the background around the planks, and filled the selection on a new layer with a color. I apparently used some kind of dull brownish-gray pukey color, Go figure.
You should have a pretty good product shaping up by now! Save it before some pixel dust gets flung from the HDD and resets your system!
Now let's take a trip to...
The Hardware Store
This brace is an interesting bit indeed (no pun intended, but if you need it, run with it!). I made the shape by simply Stroking a centerline selection of a new image, and then filling selections made with the Rectangular and Elliptical Marquee tools. I then trimmed the fill into the desired shape using the Elliptical Selection and the Lasso tools, and the Delete key.
![]()
I brushed onto another layer the selection of the shape using a brush that Photoshop whiz kid Laurie McCanna made.

I downloaded and installed a package of these brushes from her website. Next came Extensis PhotoBevel Solo to bevel the painted layer. This is why I love this filter so much! The Bolts are just dark dots with smaller light dots in the middle painted on a new layer. Merge everything but the background together, Ctrl_click, and copy & paste, and they're there! The transparency comes from Laurie's brush as well as losing the background. I must say it is an interesting effect! Be safe and sane: save!

The knob was created in a similar fashion as the braces, using a filled selection that was clipped using elliptical selections. Another filled circular selection makes the rest of the body of the knob plate, and a stroked circular selection made the ring. I believe that I turned the knob into gold using the Colorize function of the HSL adjustment. To finish, PhotoBevel was used on the knob. But if you don't have PhotoBevel, you could kill 2 birds with one stone with the Lighting Effect filter in Photoshop. Use the 2AMSPOT light, drag the appropriate sliders over to the Shiny and Metallic side, choose a color channel, and play with the slider on the bottom to get texture. This should work very well! Regardless of how you get there, just select, copy, and paste!
![]()
Congratulations! We've hung the door! Save!

The last task (aside from image mapping work) is..
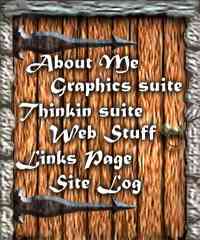
The Writing on the..Door
J !For my gate, I used the wildly popular Matura Script MT Caps because it matches the font I used for the heading on my index page. The drop shadow was courtesy of Alien Skin's Eye Candy Demo package. Yes, the Eye Candy DEMO! The Drop Shadow and Antimatter filters actually work in the demo pack (you are of course "nagged" before they are applied)! Sure you can make a layer, Ctrl-click the text, fill and blur and that'll work too! When you've got the door all written on, save it!
 Photoshop Suite
